How to Clear History in Google Chrome: A Step-by-Step Guide: Have you ever wanted to clear your browsing history in Google Chrome? Maybe you want to keep your online activities private, free up some disk space, or just start with a clean slate. In this article, I will walk you through the process of clearing your browsing history in Google Chrome, along with some related tips and answers to frequently asked questions.
Clearing your browsing history is a simple yet effective way to maintain your privacy and keep your browser running smoothly. Let’s dive right into it.


What Does Clearing History Mean?
When we talk about “clearing history” in the context of web browsers like Google Chrome, we’re referring to the process of deleting the records of websites you’ve visited and the data associated with those visits. This includes saved passwords, cached files, and other browsing data.
How to Clear History in Google Chrome
Step 1: Open Google Chrome
Launch Google Chrome on your computer. You can do this by clicking on its icon in the taskbar (Windows) or the dock (Mac) or by searching for it in your applications (Mobile Apps).
Step 2: Access Chrome Menu
Once Chrome is open, look to the top-right corner of the browser window. You’ll see three vertical dots. Click on these dots to open the Chrome menu.
Step 3: Navigate to History
In the menu that appears, hover your cursor over “History.” A submenu will open to the right.
Step 4: Select “History”
Click on “History” in the submenu. This will take you to the History page.
Step 5: Clear Browsing Data
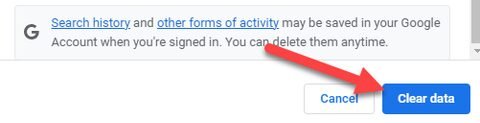
On the left side of the History page, you’ll see an option that says “Clear browsing data.” Click on it.
Step 6: Choose What to Clear
A window will pop up, allowing you to choose what data you want to clear. You can select:
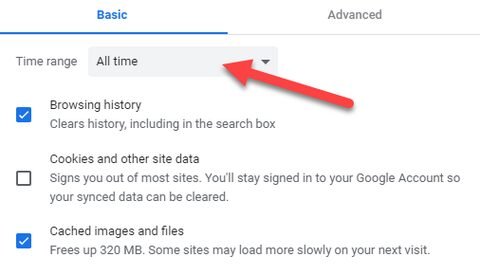
- – Browsing history
- – Download history
- – Cookies and other site data
- – Cached images and files
- – Passwords
- – Autofill form data
Step 7: Select Time Range (Optional)
You can also choose the time range for the data you want to clear. You can clear data from the past hour, day, week, month, or all time.
Step 8: Clear Data
Once you’ve made your selections, click the “Clear data” button. Chrome will start clearing your selected browsing data.
Step 9: Confirmation
After a moment, Chrome will confirm that your data has been cleared. Your browsing history is now clean!
How to Delete History in Chrome on iPhone and Android
Deleting your browsing history in Google Chrome on your iPhone or Android device is a straightforward way to maintain your privacy and free up some storage space. Whether you’re using Chrome on an iPhone, iPad, or Android phone or tablet, we’ve got you covered. In this guide, I will walk you through the steps to clear your browsing history in Chrome for both iOS and Android.
How to Delete History in Chrome on Android
To clear history in chrome browser on Android phone, follow the steps below;
Step 1: Open Google Chrome
Launch Google Chrome on your iPhone or iPad by tapping its icon on your home screen.
Step 2: Access History
1. In the top-right corner of the Chrome browser, tap the three-dot menu icon (ellipsis).
2. From the menu that appears, select “History.”
Step 3: Clear Browsing Data

Once you’re on the History page, you have two options:
- – To clear your browsing history and other data, select “Clear Browsing Data” at the bottom of the list.
- – If you want to customize what you delete, tap “Browsing History” and anything else you’d like to remove.
Step 4: Choose Time Range (Optional)
You can choose the time range for the data you want to delete. Options include clearing data from the past hour, day, week, month, or all time.
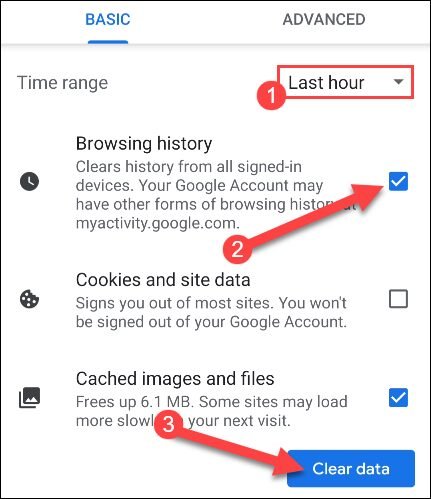
Step 5: Confirm and Clear Data
After selecting the data you want to delete and the time range, tap “Clear Data.” Confirm your action, and Chrome will promptly clear your selected browsing data.
How to Delete History in Chrome on iPhone and iPad
With the following steps below, you can clear chrome browser history on your iPhone or iPad.
Step 1: Open Google Chrome
Launch Google Chrome on your Android phone or tablet by tapping its icon on your home screen.
Step 2: Access Clear Browsing Data
1. Tap the three-dot menu icon (ellipsis) located at the top-right corner of the Chrome browser.
2. From the menu that appears, select “Clear Browsing Data.”
Step 3: Choose Time Range
Select the “Time Range” option to decide how far back you’d like to delete your browsing history and other data.
Step 4: Select Data to Clear
– To clear your browsing history and more, ensure that “Browsing History” is checked.
– Customize your selection by choosing other data types you want to delete.
Step 5: Confirm and Clear Data
After selecting your preferred options, tap “Clear Data.” Confirm your choice, and Chrome will promptly clear the selected browsing data.
How to Automatically Delete Chrome History
Privacy is paramount in today’s digital world, and Google understands that. To give users more control over their data, Google introduced the ability to automatically delete web and app activity, which includes your Chrome history. In this article, we’ll guide you through the steps to set up automatic deletion, ensuring your browsing history is regularly cleared without any manual effort.
Step 1: Access the Activity Controls Dashboard
1. Open your web browser and go to [myactivity.google.com](https://myactivity.google.com/).
Step 2: Navigate to “Activity Controls”

2. In the top-right corner of the page, you’ll see a profile icon. Click on it to access the drop-down menu.
3. From the menu, select “Activity Controls.” This will take you to the dashboard where you can manage your web and app activity settings.
Step 3: Set Up Automatic Deletion
4. On the “Activity Controls” dashboard, locate the section titled “Web & App Activity.” Here, you’ll find information about your activity data.
5. Look for the “Auto-delete” option and click on it. This option allows you to set up the automatic deletion of your activity data, including your Chrome history.
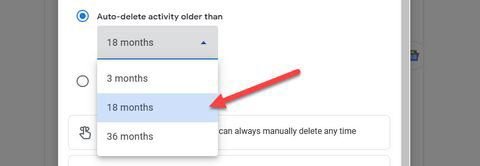
6. You will be presented with different time frame options for automatic deletion. As of June 2020, if your Google account was created after this date, web and app activity is automatically deleted after 18 months. You can choose a shorter time frame if you prefer more frequent deletion.
7. Select your preferred time frame from the options provided. You can choose from “3 months,” “18 months,” or “Keep until I delete manually.”
Step 4: Confirm Your Choice
8. After selecting your desired time frame, click on “Next.” Google will provide a brief explanation of what your choice entails.
9. Review the information, and if you are satisfied with your selection, click “Confirm.”
Step 5: Automatic Deletion is Set Up
10. Google will confirm that your automatic deletion settings have been updated. Your Chrome history and other web and app activity will now be automatically deleted according to your chosen time frame.
FAQs: Frequently Asked Questions
Will clearing my browsing history delete my bookmarks?
No, clearing your browsing history won’t delete your bookmarks. Bookmarks are a separate feature in Chrome and won’t be affected when you clear your history.
Can I recover cleared browsing data?
No, once you’ve cleared your browsing data, it cannot be recovered. Make sure you only clear data that you’re okay with losing.
Does clearing history make my browsing faster?
It can help. Clearing history removes cached files, which can sometimes slow down your browsing experience.
Can I set Chrome to clear history automatically?
Yes, you can configure Chrome to automatically clear your browsing data when you exit the browser. Go to Chrome Settings > Privacy and security > Clear browsing data > “On exit.”
Conclusion
Clearing your browsing history in Google Chrome is a straightforward process that can help protect your privacy and improve your browsing performance. Whether you want to remove traces of your online activities or just free up some space, following the steps above will help you keep your Chrome browser clean and efficient.